Electrochemical and Biological Simulation for Microfluidics

My research as a graduate student focuses on biosensing applications using electrochemical impedimetric methods. Unlike mechatronic systems, these applications consider a dynamic environment at such a microscale, it is quite hard to perceive what is really going on when we merely recognize the change of physical property. I usually ask myself: What is the underlying mechanism? Tucked away from the limit of horizon of the human eye, we often see nothing happening when doing these experiments.

That is why simulation is so important! In this project, I performed 3 simulation tasks in order to visualize the changes of important physical properties for my study (impedimetric microfluidic chip for biosensing) using COMSOL Multiphysics.

The tasks are:

  1. Velocity field simulation inside microfluidic channel.
  2. Real-time molecule immobilization on gold surface.
  3. Electrochemical impedance spectroscopy (EIS) simulation.

The result of task 1 supports the hypotheses of task 2 and 3.

Physical Environment Setting

The simulation environment is set as the interior of a microfluidic channel with gold microelectrodes. See the film below for visualization.

The chip is fabricated using soft lithography and photolithography. The microfluidic channel has a width of 1mm and a height of 100μm at the center. The gold microelectrodes form a pair for square pads (300×300μm) at the center of the channel (Fig. 1).

Figure 1. Microfabrication process, dimensions, and microscopic view of the microfluidic electrode chip used in this project.

Velocity Field Simulation Inside Microfluidic Channel

The objective of this task is to simulate the fluid velocity field inside the channel on a sliced plane. Due to the fact that 3D simulation is time-consuming, if a 3D environment can be reduced to a 2D environment, then a large amount of time can be saved. By performing this task, it can be seen if dimension reduction modeling of task 2 and 3 are feasible.

Considering the physical nature of the microfluidic channel, a laminar flow model is implemented along with the Navier-Stokes equation:

$$\rho(\textbf{u}\cdot\nabla)\textbf{u}=\nabla\cdot[-pI+\mu(\nabla \textbf{u}+(\nabla \textbf{u})^T)]+F$$

, which means a balance between inertia (\(\rho(\textbf{u}\cdot\nabla)\textbf{u}\)), pressure (\(-pI\)), viscous (\(\mu(\nabla \textbf{u}+(\nabla \textbf{u})^T)\)) and external (\(F\)) forces. A stationary study is implemented (\(\rho \nabla \cdot \textbf{u}=0\)), and water is set as the fluid.

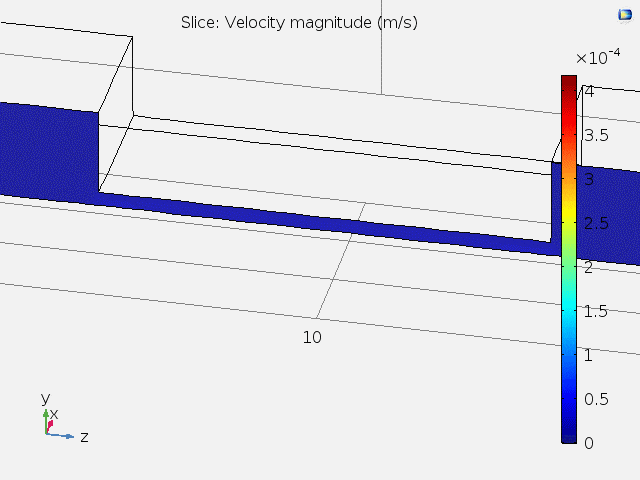
Fig. 2 shows the 3D velocity field inside the channel. A bigger arrow indicates a larger velocity magnitude. The reason that the velocity is faster at the center is because of the lower channel height.

Figure 2. 3D velocity field inside microfluidic channel.

Fig. 3 shows animated 2D velocity fields of sliced planes inside the channel. Due to laminar flow, velocities near the boundary get close to zero. However, the steady-state velocity reaches a constant value away from the boundary.

Figure 3. 2D velocity fields for xy and zy sliced planes.

A top view of the velocity field and the velocity at different x positions are shown in Fig. 4. It can be concluded that at the center of the channel where the microelectrodes lie, the fluid velocity stays constant, and subsequent tasks can be carried out using 2D models.

Figure 4. Top-view and x position-dependent velocity magnitude of fluid.

Real-time Molecule Immobilization on Gold Surface.

For microfluidic electrochemical biosensors, it is quite common that immobilization of sensing elements takes place at the center of the channel on electrode surfaces (e.g. Au). In this task, molecules are simulated to flow past the channel, and be immobilized on the electrode pad at the bottom center. A slice on the zy plane is used as the modeling geometry of this task (Fig. 5).

Figure 5. Modeling geometry used in task 2. A sliced area of the microfluidic channel with pad electrode at the bottom center is used.

Here, the molecules convect and diffuse near the surface, the rate of immobilization is determined by several factors including the inlet concentration (c0), diffusion coefficient (D), maximum surface molecule density (Γs). The convection-diffusion equation and transport-adsorption equation are used along with time-dependent study:

$${{\partial c} \over {\partial t}} + \nabla \cdot (-D\nabla c) + \textbf{u} \cdot \nabla c = R$$

$${{\partial c_s} \over {\partial t}} + \nabla \cdot (-D\nabla c_s) = k_{ads} c(\Gamma_s – c_s)-k_{des} c_s$$

For the transport-adsorption equation, it is assumed that the change of surface concentration plus the rate of surface diffusion equals the rate of Langmuir adsorption isotherm.

Fig. 6 shows the time-dependent surface concentration (cs) change when c0 = 1μM, and Fig. 7 shows the binding curve (probe density vs time) for different values of c0.

Figure 6. Time-dependent surface concentration (cs) change. t = 0~18hr.

Figure 7. Probe surface density (molecules/cm2) vs time (hr).

At concentrations above 0.1μM, the probe density almost saturates to a value of 9.6×10¹² molecules/cm2 before immobilizing for 10 hours. The result highly resembles a typical binding curve, suggesting the possibility for computer simulating assisted optimization of in vitro parameters, which is really helpful for understanding underlying mechanisms for the system.

Electrochemical Impedance Spectroscopy (EIS) Simulation.

EIS is a rapid and label-free method for detection of bio-molecules, and is widely implemented on a variety of biosensors. In this task, I simulated EIS diagrams by changing the values of the heterogeneous rate constant (k0) and the double layer capacitance (Cdl). Both Cdl and k0 are affected by the immobilized surface molecule density on an electrode surface, and are important physical properties when analyzing EIS data. A slice on the xy plane is used as the modeling geometry of this task (Fig. 8).

Figure 8. Geometry being simulated for task 3. A 2D plane is sliced in the xy direction.

Here, a sinusoidal voltage wave is applied between the two electrodes (amplitude ≅ 5mV), and Bode plots and Nyquist plots can be drawn according to the measured impedance. According to the surface redox reaction, an equivalent circuit can be constructed. The equivalent circuit for this task is shown in Fig. 9.

Figure 9. Equivalent circuit used in my research and task 3.

Fick’s 2nd law and Butler-Volmer equation are used for simulation:

$${{\partial c}\over{\partial t}} = \nabla \cdot (D\nabla c)$$

$$j = nFk_0 (c_{Red} e^{ {(n-\alpha_c)F\eta} \over {RT} } – c_{Ox} e^{ {-\alpha_c F\eta} \over {RT} })$$

EIS plots are simulated for different values of k0 and Cdl (Fig. 10).

Figure 10. Bode and Nyquist plots for the simulated EIS data. k0 has a range from 0.001 to 0.1 (cm/s), and Cdl has a range from 0.01 to 100 (uF/cm2).

By undergoing this simulation project, I furthermore understood some fundamental interactions between the physical properties and outcome of my research to a new depth, and developed new concepts about how to improve it.

After completing this project, I also used COMSOL for simulating time-dependent concentration gradient variation of redox molecules in my 1st author journal paper “Diffusion impedance modeling for interdigitated array electrodes by conformal mapping and cylindrical finite length approximation”.

[Full report for this project]

Coffee Maker Alarm

This is a project which I and my classmates had finished in a course focusing on practical implementation for mechatronics and system design, and is a sequel of the previous Aroma Alarm Clock project. We designed an Android app-controllable alarm clock which can heat up objects such as a water-filled container, and intend to further improve it for making coffee, so that one can enjoy a fresh cup of coffee in the morning after awakening. Similar to the previous one, I worked as the engineer in our group, and designed and constructed the hardware system.

System Framework

Fig. 1 shows the overall system architecture, which several electronic components (e.g. clock module, LCD display…) are controlled by a microcontroller that can communicate with a mobile application using a Bluetooth module. The alarm clock can be controlled either using its own hardware input (buttons) or using the mobile app. Simply put, the system has same the functions as a typical alarm clock, but has two additional features:

1. Temperature controllable heater.
2. Bluetooth communication.

Figure 1. System architecture for the coffee maker alarm.

Hardware

Arduino Uno, DS1302 chip, HC-06 and LCD1602 are used respectively for the microcontroller, real-time clock module, Bluetooth module and LCD display module. Being an end-semester project in class, the components are simply connected using a breadboard. All the hardware components except the heater are packed using patterned cardboard in a simply looking fashion (Fig. 2).

Figure 2. Hardware appearance of the coffee maker alarm.

A ceramic heater plate and temperature sensor are integrated for realizing temperature controlling (Fig. 3), and are connected out from the main hardware. The total cost for all the components is 1,741 NTD (≅ 60 USD).

Figure 3. Heater and temperature sensor.

Software

App Inventor 2 is used as the platform for creating the Android app for controlling the hardware. Fig. 4 displays the designing interface for the mobile app using the platform.

Figure 4. Design interface using App Inventor 2.

The coding section for this platform is very unique and easy to get started. It implements a block-based programming method which developers can create procedure by dragging pre-defined blocks together to for performing a certain function. Developers with no programming background can use this kind of environment for creating mobile apps. Fig. 5 shows a gallery containing the complete code for the alarm clock controlling app.

Figure 5. Gallery of block codes for the alarm clock app.

Here’s a video demonstration for using this system:

After finishing this project, I acquired important skills for system design and mechatronics integration. This enabled me to create more interesting and sophisticated projects such as the Automated Microfluidic Controlling Platform, Remote Commandable Self-Driving Toy Car and Real-time Impedance Detection Systems.

Aroma Alarm Clock

As an old saying goes, “An hour in the morning is worth two in the evening”. What we encounter and conceive during this period is largely intertwined with our whole day. However, what is the most important thing that we encounter in the morning? It is about waking up. Nowadays, we wake up by the noisy, buzzing sound of an alarm. How would it be like if we could wake up by a scent, a fragrance, wiping away the unsatisfactory memories of the past? What can be changed to fulfill a better awakening?

An aroma alarm clock should fill in the answer. When I was a junior, I enrolled in a program called “NTU Creativity and Entrepreneurship Program” (NTUCEP). In this program, students with similar ideas form groups and learn about entrepreneurship by practice. After a couple days of brainstorming, our group came up with the concept about developing an alarm clock that can wake people up using scent packs. Apart from being awakened by a loud ringing sound of an alarm, fragrances (as we had proposed) have a milder, progressive effect for waking people up. We named our product “Sensio”, a Latin noun of the meaning “thought”.

Market Survey

In order to verify the market demand of this proposal, we devised a questionnaire for investigating the views and habits of people about waking up, which 1320 valid responses were collected. A score of 0 ~ 7 is used to quantify the “discomfort level” for waking up, in which a level of 0 ~ 3 is regarded as painless, and 4 ~ 7 as painful. Fig. 1 shows the discomfort level distribution of all the samples, and Fig. 2 shows the distributions by occupation. It can be seen that regardless of identity, the majority of people feel painful when waking up (students: 71%, office worker: 62%, other: 51%, overall: 68%). Moreover, we analyzed their habits of lying in bed after awakening. Fig. 3 shows the proportion and durations for lying in bed. Accordingly, over 44% of people lie in bed for over 15 minutes, and the average duration is 15.07 minutes. Theoretically, this means if a product could help lower one’s discomfort level of waking up, and reduce the duration of lying in bed after awakening, he could approximately increase 3.8 days/year of effective time. Not only having a favorable morning, but also enhancing his work efficiency.

Figure 1. Discomfort level distribution of waking up.

Figure 2. Number of people vs discomfort level by occupation.

Figure 3. Duration of lying in bed after awakening.

From the above analysis, we became confident about the large market demand for a better quality of getting up. For me, being the leading engineer role in our group of six meant turning ideas into reality. This had been a difficult period but a time of inspiration and excitement. I put into practice what I had learned within the past few years for developing a system, a hardware that can really be used as a product.

Sensio v0.1

I developed two preliminary versions of the hardware, with the 1st version using Arduino as the CPU (Sensio v0.1) (Fig. 4). In this version, an Arduino chip, a time clock module (DS1302), a shift register (74HC595N), relays, button switches, LED displays, a buzzer, a fan and a potentiometer are used for the alarm clock (Fig. 5). 10 different themes are written inside the system and a few simple features are integrated within (Fig. 6 details every mode of the alarm clock and the corresponding function of the buttons). This version serves as the proof-of-concept version for making an aroma alarm clock. Although being simple and somewhat rough, it demonstrated to my team and our professors a solid proof and feasibility of our objective.

[Source code for Sensio v0.1]

Figure 4. Photograph of Sensio v0.1.

Figure 5. Hardware architecture of Sensio v0.1.

Figure 6. Alarm modes and button function for Sensio v0.1.

During this period, we earned 40,000NTD in a fundraising event in our program, and won the Best Potential Award in the 14th NTU innovation competition. Fig. 7 shows the poster we had used in the competition. During that period, we had great enthusiasm and motivation, and dreamed that one day our product would become on-sale and we could establish a real listed company of our own. We entered the NTU garage, which is an incubator for startups that are closely linked to NTU.

Figure 7. Poster of product Sensio for the NTU innovation competition.

Sensio v0.2

The second version Sensio v0.2 was created during my second semester as a junior. This time, an IC chip (ATMEGA328P) is used as the CPU rather than Arduino in order to lower the cost of the system and decrease its volume. Moreover, a PCB layout for fixing electronic parts on a solid panel is used. Fig. 8 illustrates the structural model of Sensio v0.2, Fig. 9 shows a photograph of the integrated electric components and its corresponding PCB layout schematic, and Fig. 10 shows photographs of the laser-cut 3D outer case.

[Source code for Sensio v0.2]

Figure 8. Structural model of Sensio v0.2.

Figure 9. Electronic component-integrated PCB board of Sensio v0.2 and its corresponding layout schematic.

Figure 10. Outer case (blue) and scent pack holder (orange) of Sensio v0.2.

We were thrilled after these accomplishments, since never had a team of the same period achieved such a high level of completeness, especially when concerning the integrity of hardware and software. These remarkable things happen so quickly, so fleeting for us to catch up with. The truth is, we are still so far from success, since we were still students back then. Reality pulled us back, and we started asked ourselves: are we ready to give up some things and dedicate ourselves to entrepreneurship? Our dream product, the aroma alarm clock, had once seemed so close, yet had never seemed so far.

Although in the end, the functional aroma alarm clock wasn’t successfully made, what I’ve learned during this event is unprecedented compared with my past experience, not only techniques for hardware and software development, but also important philosophies for entrepreneurship. This project inspired me to a great extent, and enabled me for creating future hardware-related projects (e.g. Automated Microfluidic Controlling Platform, Real-time Impedance Detection Systems, Surface Plasmon Resonance Platform) in my own field of research.

Figure 11. Photograph of our team and professor.

Miniaturized ELISA Platform

Studying in a cross-disciplinary department meant having the freedom to choose what to explore. I entered the intelligence bio-sensing lab (previously named bio-molecular device lab) hosted by professor Lin-Chi Chen when I was a junior. There I was trained how to put into practice the engineering skills that I have learned during college, and implementing them on biosensing. I became interested in manufacturing devices that can realize automation, assist research, or help reduce the cost for lab experiments (e.g. Real-time Impedance Detection Systems, Surface Plasmon Resonance Platform, Automated Microfluidic Controlling Platform). This miniaturized ELISA platform serves as the first one among those devices and systems I had created.

The enzyme-linked immunosorbent assay (ELISA) is a commonly used analytical biochemical assay that uses antibodies against the protein to be tested to detect the presence of ligands (usually proteins) in the liquid sample. However, the traditional method for performing this assay is costly and time-consuming. Therefore, I decided to construct a miniaturized ELISA platform that can help reduce sample usage, and thus make it cheaper.

Small circular holes are cut on a thin acrylic board are by laser cut, a holder for assisting supporting the microwell is fabricated using 3D printing, and PVDF films are used as the base material for protein immobilization (Fig. 1).

Figure 1. Materials used for the miniaturized ELISA platform

The acrylic board with holes and another board with no holes are used to clip the PVDF film tight, wrapped with tape, making microwells with a volume capacity of ~10μL (Fig. 2 left). The microwell is put on the 3D-printed holder, and the right picture of Fig. 2 shows the microwell platform with each well containing 10μL deionized water.

Figure 2. PVDF clipped with an acrylic board with holes and another board without holes (left), and the microwell platform with every well containing 10μL deionized water.

Streptavidin-HRP is diluted using PBS buffer, and 5μL of the solution is added in each of the microwell. Then 5μL TMB is added for validation of the colorimetric detection method. Fig. 3 shows the experiment result using the platform for qualitative analyzing different concentrations of streptavidin-HRP. It can be seen that different concentrations yield different intensities of absorbed light signals (λ = 450nm), thus this platform can be further improved for real experimental use.

Figure 3. Different concentrations of streptavidin-HRP with TMB for colorimetric detection using the miniaturized ELISA platform.

This project is the first one for me to implement simple skills that I have learned during the first three years in university on real bio-detection research issues, which motivated me to start thinking of practical methods to use engineering techniques for solving problems in an interdisciplinary way.

Temperature and Humidity Sensor

This is a homework in class where we are assigned to utilize the temperature and humidity sensor DHT11 and an LCD display. Once activated, the LCD display will show either the temperature or the humidity being detected by the sensor. A button can be pressed to switch between temperature and humidity display.

Complex functionality can be achieved by including pre-coded libraries for controlling these components using Arduino, the development board I had used.

Though being a very simple project, such components serve as the simple building block for constructing a sophisticated hardware system. Therefore, this project plays an important role in the initial stage of hardware design for me.

Here’s a simple control process demonstration:

Bladeless Fan

The Dyson cooling fan is an eye-catching product. At first sight, some people may wonder how the seemingly bladeless fan really works because it simply looks like a structure with no air outlet. The fact is it can does have a small outlet at the inner part of its “ring”, and has the ability to take fluid dynamics into practice and enhance the air flow, making it also an air multiplier.

Figure 1. Dyson bladeless fan and simulated air flow.

In fluid dynamics class, I and a classmate of mine decided to construct a bladeless fan by our own and study the air multiplying phenomenon. We used 3D printing to fabricate the “ring” part of the fan, and a small centrifugal fan for connecting with the inlet of the ring part and inject a strong current inside.

Figure 2. Illustration and photograph of the bladeless fan.

Now we wanted to simply test whether this structure really leads to an air multiplying effect. We divided the outlet are into 9 sections, which can be represented using a 3×3 rectangular grid, and calculated the wind speed of every section at different input voltages for the centrifugal fan.

Fig. 3 shows the air velocity profile of the output wind, and Fig. 4 shows the magnification of air flow.

Figure 3. Air velocity (t_m [=] m/s) of 3×3 section grid at different input voltages.

Figure 4. Magnification of air flow at different input voltages of the centrifugal fan.

During this project, I learned more about the fundamentals of fluid mechanics, and memorized the relevant rules more deeply, which made me have a better understanding of this subject.

Guess the Number (iOS)

This is the first iOS game I had made using Xamarin, and is the second project of the guess the number series (after Guess the Number (Windows) and prior to Guess the Number AI). (The two-player game is also named Bulls and Cows.)

At the start of the game, a random 4-digit code is generated by the app and the player starts to guess that code. The player can restart the game anytime by pressing RESET, and a history of guesses and results are shown in a list at the bottom.

Here’s a demonstration of the app:

Considerations for app development are quite different from computer programs, such as the different screen sizes for different mobile platforms, and most of the time only a touch screen can be used. After finishing this project, I acquired some important fundamental concepts and know-hows for app design.

Nonogram AI

Nonograms (also known as Picross, Griddlers, Pic-a-Pix, and various other names) are picture logic puzzles, in which the cells in the grid must be colored or left blank according to the numbers on the side of the grid to display hidden pictures.

Figure 1. The initial and complete state of a 25×25 grid Nonogram.
(Source: https://www.nonograms.org/nonograms/i/32344 )

For a classical type of game, the numbers are a form of discrete tomography that measures how many unbroken lines of filled-in squares there are in any given row or column. For example, a clue of “1 2 3” would mean there are sets of one, two, and three filled squares, in that order, with at least one blank square between successive sets.

Solving Nonograms can be very time-consuming, and can be tremendously brain-twisting as the grid size increases, thus I created an AI program for automatically solving these puzzles.

The program utilizes the depth-first search algorithm that runs recursively from the top to bottom row. For the jth column of the ith row, the black or blank spaces must satisfy the tomographic rules formed by the numbers of the current row and column. This is a relatively simple approach for calculating the answer. However, because the algorithm does not solve the game using a more intuitive method for solving interrelated constraints, it will use a lot of time for big grids (over 40×40).

For the input format of this program, two numbers indicating the number of rows and columns are given first (n and m). Afterwards, there are n rows of data, with each row k starting with a number nk indicating how many numbers are given in that row, and followed by nk numbers representing the discrete tomography of black spaces of that very row; then there are m rows of data, and also starting with a number mk for the kth row, and followed by mk numbers representing the discrete tomography of black spaces for the kth column.

Here’s an example input for the Nonogram in Fig. 1:

25 25
1 8
2 7 3
1 16
2 11 4
2 13 2
2 14 2
1 18
2 8 4
2 6 4
2 5 5
3 4 2 2
3 4 3 1
3 3 2 1
2 3 2
2 3 2
3 2 1 4
3 2 1 4
3 2 1 4
3 3 1 4
2 5 4
1 11
1 10
1 5
1 5
1 6
1 1
1 2
1 2
1 4
1 11
1 13
1 15
2 9 3
2 8 3
3 7 5 2
3 7 3 4
3 6 2 3
3 8 3 2
2 13 2
2 10 2
3 5 5 3
4 4 1 4 6
4 1 2 2 8
3 3 1 10
4 3 1 4 4
4 2 1 2 3
3 2 1 2
2 2 1
2 2 1
1 1

A demonstration for using the AI program for solving a 39×50 Nonogram in about 22 seconds is shown below. The result displays an owl sitting on a branch (Fig. 2).

Figure 2. The complete state of a 39×50 Nonogram displaying an owl on a branch.

[Download program for the Nonogram solver AI]

[Source code for the Nonogram solver AI]